Showing posts with label Home-made nut milk. Show all posts

Tuesday, April 1, 2014

Sprouts

March's class was on sprouting and we had a great time learning about the many things that can be sprouted.

Alfalfa seed mix
Mung bean mix
Lentils
Hard red winter wheat
White wheat
Kamut
Oat groats
Red Quinoa
White Quinoa
Amaranth
Brown rice
Harvest rice mix (from Costco)
Black beans
White beans
Sunflower seeds (not the typical ones you eat, these are black and grown for sprouting)
Wheat grass
Almonds
Walmuts

Here are some things we learned from the class: 
1. Wheat grass is made by sprouting the wheat first, then planting in a thin layer of soil.  It is not hard to grow, but takes a bit of dedication in keeping it moist, but not too moist or it gets moldy.  It is extremely healthy for you.
2.  Almonds and walnuts don't really sprout tails, but taste incredible (and quite different) when soaked.  The walnuts lost their bitter taste.  I want to only eat soaked walnuts from now on.  I used walnuts I bought from Costco and rinsed them in a strainer to get the dirt, dust and whatever from the processing and packaging, then put them in a bowl and covered with water.  Do the same thing with almonds.  Always drain and rinse one more time before using.  
3.  Almond milk is so easy to make from soaked almonds.  I used a 3 to 1 ratio, meaning 3 cups water to 1 cup almonds.  Most people thought it tasted thinner that store bought almond milk.  A 2 to 1 ratio might taste more like store bought if that is your preference.  
4.  The harvest rice mix from Costco did not do well.  There was one rice in the mix that did not sprout and molded in the jar.
5.  All the wheat sprouted well and I can't wait to use it in my waffle recipe.  I took the sprouted wheat and kamut (a type of grain, similar to wheat) and dried in the dehydrator at 105 degrees so as not to kill the living enzymes.   This image is of the dried sprouts on the dryer sheet.   I am going to grind them into flour and make waffles out of them and add some of the fresh wheat sprouts to the batter.

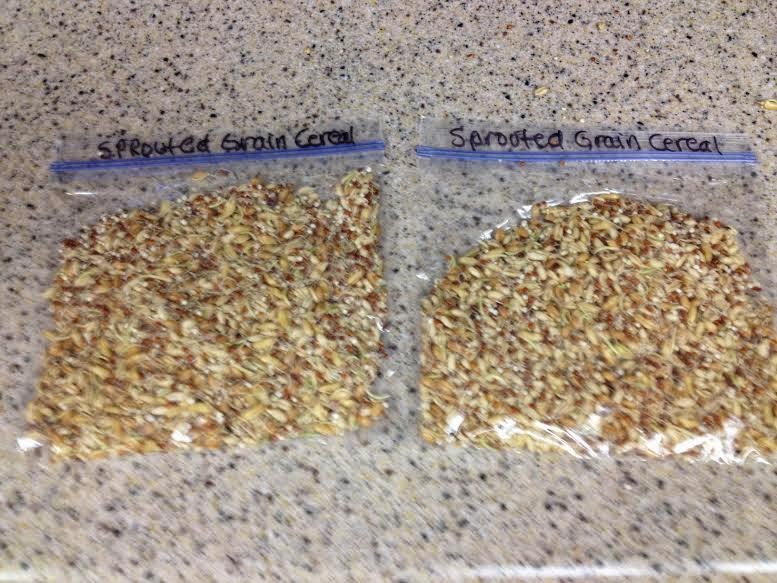
6.  I had a lot of leftover sprouts so I combined some of the red and white wheat, kamut, both quinoa's, oat groats, and the amaranth, placed some into baggies and placed into the freezer for later.  I took 1/2 cup, placed in a thermos, covered with a cup of boiling water, placed the lid on, shook gently and let sit overnight.  In the morning I drained the water off and added the almond milk I made for the class and added honey and a banana.  It made a delicious, highly nutritious breakfast.  Here are the bags of cereal before they went into the freezer.
7.  The lentils I have been using on my daily salad along with the alfalfa seed mix.  They are really tasty and I love knowing that I am getting a high concentration of enzymes, minerals and nutrients from them.  I also made lentil soup with some of the sprouts.  I probably killed some of the live enzymes from cooking them as long as I did, but the soup was so delicious.  The best part, Dennis ate 2 bowls full and said it tasted really good.  That's unusual for him.  Here is a picture of my salad with sprouts and sprouted lentil soup.  SO YUMMY!

8.  I loved the taste of the sunflower seed sprouts.  I had never seen them before Angie (my niece) brought them to demonstrate that night.  You grow them similar to wheat grass.  They may not be quite as nutritious as wheat grass, but they taste SO much better.  
9.  The beans sprouted okay, but not so much as most of the other things.  Only a part of each jar actually sprouted tails.  They were too hard to eat raw for my taste, so I made a soup out of them.  Dennis really like this soup also.  Perhaps the difference in taste of the bean and lentil soups from my regular soups using dried, came from sprouting them first.

If you haven't tried sprouting before, now is a good time to try.  The health benefits are amazing and they actually taste really good.  It is easy to do.

Sprouting steps:
1. Place seeds, grains, or beans in a glass jar or sprouting tray (there are many different types of sprouting trays on the market.  I just use a wide mouth quart jar with a special sprouting lid I got at my local health food store.  I didn't have enough of those lids to go over all the sprouts so I used new nylons bigger than the mouth of the jar and held it tight with rubber bands.  You could also use muslin, cheese cloth, or fine wire mesh.
2. Cover with water (r/o or distilled is best) and keep in the dark for 8 to 24 hours.
3. Drain water 
4. Rinse with fresh water, drain again, making sure to get all the water out.
5.  If using a jar, place upside down at an angle in the corner of the sink or in a dish drainer and let drain completely for a few minutes.  I then place mine on the counter top until time to rinse again. If you're using a sprouting tray, follow their instructions.
6. Complete step 4 and 5 every morning and night for approximately 3 or 4 days.  You don't want the sprouts to get as big as they sell in the store.  Those aren't really sprouts, they are plants.  
7.  Enjoy

Saturday, September 28, 2013

September's Healthy Eating Support Group Notes and Recipes

What a great discussion we had at Thursday's meeting and with some really good questions asked.
Some of the things we discussed:
*What is the best oil to use?  Coconut oil and Extra virgin olive oil
*What are good alternatives instead of dairy?  Almond milk, coconut milk, Organic soy milk
 I have included the recipes for homemade Almond and Coconut milk below
*How to get more vegetables in our diet?
     Smoothies, lettuce salads, stir fry's, crudites, and making your own fresh juices were just some of the things we discussed.

You heard me talk about the Green Smoothie Girl a few times.  Here are some great articles I found on how two families get their kids to eat healthy.  You'll find the links, here, here and here
     
Homemade Almond Milk
       1 cup soaked almonds (soak 6-8 hours or overnight), rinse thoroughly
       2 or 3 cups distilled or filtered water   (I use 3 cups)
       1 tsp vanilla
       Sweeten to taste (I don't usually add sweetener, but if I do, I use Agave)
     
Directions: Place soaked, rinsed, drained almonds into blender, add water and blend on high until thoroughly blended.  The amount of time will be determined on your particular blender.  High speed blenders like the Vitamix or Blendtec take about a minute.  Pour blended mixture into a large bowl lined with a nut bag, 100% cotton muslin, or linen ( I made my own nut bag out because the store bought one wasn't big enough).
Squeeze the "milk" out of the bag until all that is left if dry almond pulp.  Stir vanilla and sweetener into milk and refrigerate.  This keep about 3 days, if it lasts that long.  The milk will separate while in the fridge.  Just shake or stir well before using.
Notes: I usually put my almonds on to soak the night before and make the milk the next morning which takes about 5 minutes or less.  I don't usually put vanilla and sweetener in mine, because I mainly use it in recipes that already call for these ingredients.  If you are going to drink it, you might want to add them.

Homemade coconut milk is made the same way as Almond Milk, but instead of Almonds, use dried shredded coconut (unsweetened only, found in the Health food store).  I use a 2/1 ratio (2 cups water, 1 cup coconut).

Green Smoothie Recipe #1
all amounts are approximate and to personal taste
1 cup milk (a good place to use your homemade coconut milk)
1 cup frozen pineapple
1 frozen banana
handful of spinach (or other greens such as: chard, dandelion, kale, collard, etc)
optional - 1 tsp coconut flavoring

Place milk and greens in first and blend a little, then add frozen fruit a few pieces at a time, and blend until fruit is thoroughly blended.  If too thick, add more milk, If too watery, add more frozen fruit or ice cubes.

Green Smoothie Recipe #2
all amounts are approximate and to personal taste
1 cup apple or grape juice (or water)
1 cup mixed frozen berries
1 frozen banana
handful of spinach (or other greens)
optional - handful of frozen grapes

Place juice or water and greens in blender.  Add frozen fruit a few pieces at a time and blend until fruit is thoroughly blended.  If too thick, add more juice, if too watery, add more frozen fruit or ice cubes.

Notes: I make my own homemade juices so I know there are no preservatives and fillers.  This is not an option for many people, so look for 100% pure fruit juice, without added ingredients.  As I mentioned, I don't like my smoothies left in the refrigerator overnight.  I think it gets too "pulpy" tasting.  This did not bother others in our group.  If I make more smoothie than I can eat at one time, I pour it in a cup or pint mason jar and cover with tin foil and a rubber band.  This makes a quick and easy lunch.  Just place frozen smoothie in an insulated lunch bag, and by lunch it is just right.  Make sure and pack a spoon, I forgot this once and it was challenging to eat.  Or, you can take a frozen smoothie and place in the refrigerator just before going to bed.  It will be about perfect in the morning.   When traveling in a car, I make several smoothies ahead of time and freeze.  Then place them all in a small cooler and cover with ice.  They last for several days this way.  
   Smoothies can be made out of most any fruit.  Be adventurous and try different things.  During the winter we often make Orange smoothies, which resembles an orange julius.  We always buy fruit when it is in season and freeze.  I peel, then slice into pieces that will blend easily and lay the slices on a cookie sheet and freeze.  Then just place the frozen fruit into a Ziploc bag and you have individually frozen fruit for months to come.  Freezing fruit while in season is more economical and much better tasting than fresh fruit (transported from another country) purchased during  other times of the year.